
Create Repeater Post Meta in WordPress
Repeater post meta is just a regular post meta with a small difference: one record can hold multiple or array values. In this post, we will implement repeater post meta boxes in the admin area of WordPress.

When we store a single value like a zip code with our post that is stored in the post meta table as a single record value. But when we want to store multiple values in a single record of the post meta table, we store them as an array, which we present as repeating input fields in meta box form. This post explains with code snippets how to add repeating post meta in WordPress without a plugin.
WordPress Function to Add Post Meta
To add post meta boxes, we need to utilize some of WordPress built-in functions. These functions enable developers to add meta boxes, get post meta, and update post meta with ease. WordPress add_meta_box function is used to register a meta box.
add_meta_box($id, $title, $callback, $screen = null, $context = 'advanced', $priority = 'default', $callback_args = null);
- $id: (string) (Required) - ID for meta box id attribute.
- $title: (string) (Required) - Title of meta box.
- $callback: (callable) (Required) - The function that will actually contain the HTML to render our meta box.
- $screen: (string|array) (Optional) - The screen or screens on which the meta box will be shown.
- $context: (string) (Optional) - Context of the screen where the meta box will be displayed. Possible values are "side", "normal" and "advanced". The default value is "advanced".
- $priority: (string) (Optional) - Priority of appearance of the meta box. Possible values ("default", "low", "high"). The default value is "default".
- $callback_args: (array) (Optional) - Array of parameters passed as a second parameter to your callback function.
get_post_meta($id, $key, $single);
- $id: (int) (Required) - Unique ID of post.
- $key: (string) (Optional) - Key of post meta in post table.
- $single: (bool) (Optional) - Whether to return the value as a single value.
We also need to be able to add or update meta box values. The following function is recommended to safely add or update post meta when a post is created or updated.
update_post_meta($post_id, $meta_key, $meta_value, $prev_check = '');
- $post_id: (int) (Required) - Unique ID of post.
- $meta_key: (string) (Required) - Unique meta key for post meta.
- $meta_value: (string) (Required) - Value for post meta.
- $prev_check: (mixed) (Optional) - If provided, only post meta with the provided value will be updated.
How to Add a Repeating Post Meta Box in WordPress
In our previous post Create Custom Post Meta in WordPress, we added price and area as post meta. Today, we will use the same approach and add "Amenities" for a property post. These amenities can be different for each property. When we save these amenities post meta, it will be saved as an array in the database.
We will create post-meta.php and use the add_meta_boxes action hook to render the post meta boxes. We will use the same save_post_{$post->post_type} hook to save repeater post meta. We will need JavaScript to add more rows to the form field. We will also add some CSS styles for our meta boxes.
Follow these steps to add a repeater post meta box in WordPress:
- Use an action hook
add_meta_boxes, with theadd_property_metafunction. - Use the function
add_meta_boxin theadd_property_metafunction with the desired parameters. - Render the post meta fields in the callback function.
- Use the
get_post_metafunction to fetch saved post meta values. - Loop through each amenity if they are already saved and display each amenity in a table row.
- Use an action hook
save_post_property, with thesave_property_metafunction. Thesave_post_propertyis triggered when a post type "property" is saved. - Save the post meta using the
update_post_metafunction in thesave_property_metafunction. - Make sure to trim amenities values posted and use the
sanitize_metafunction to sanitize meta values before saving.
post-meta.php
<?php
add_action('add_meta_boxes', 'add_property_meta');
function add_property_meta(): void
{
add_meta_box('property_meta_box', __('Post Data', 'text-domain'), 'render_property_meta', ['property']);
}
function render_property_meta($post): void
{
wp_enqueue_style('post-meta', 'URL_OF_OUR_STYLESHEET');
wp_enqueue_script('post-meta', 'URL_OF_OUR_JAVASCRIPT');
$amenities = get_post_meta($post->ID, 'amenities', true);
?>
<div class="amenities">
<h3>
<?php _e('Amenities', 'text-domain'); ?>
</h3>
<table class="form-table">
<thead>
<tr>
<th class="w-auto"> </th>
<th class="delete"> </th>
</tr>
</thead>
<tbody>
<?php
// If there are amenities already saved show it
if (!empty($amenities)) {
foreach ($amenities as $i => $amenity) {
?>
<tr>
<td><input type="text" name="amenities[<?= $i; ?>]" class="large-text" value="<?= $amenity; ?>"/>
</td>
<td><a href="javascript:void(0)" class="delete-amenity"><span
class="dashicons dashicons-trash"></span></a></td>
</tr>
<?php
}
} ?>
</tbody>
</table>
<button type="button" class="button add-more"><?php _e('+ Add More', 'text-domain'); ?></button>
</div>
<?php
}
// Add action to save amenities only for property post type
add_action('save_post_property', 'save_property_meta');
function save_property_meta($post_id): void
{
$amenities = [];
if (!empty($_POST['amenities'])) {
$amenities = $_POST['amenities'];
$amenities = array_map('trim', $amenities);
$amenities = array_map('sanitize_meta', $amenities);
$amenities = array_filter($amenities);
}
update_post_meta($post_id, 'amenities', $amenities);
}
Add New Post Meta Field Dynamically with JavaScript
When the button "Add More" is clicked, we add a new row with an empty text field for the amenities. All these rows will be saved as array values in the post meta table.
javascript.js
<script>
    jQuery(document).ready(function () {
        const $ = jQuery;

        // Add another row for amenity
        $(".amenities .add-more").click(function () {
            let last_row = $(".amenities > .form-table > tbody > tr");

            let count = last_row.length === 0 ? 1 : last_row.length + 1;

            let row = '<tr>' +
                '<td><input type="text" name="amenities[' + count + ']" class="large-text" value="" /></td>' +
                '<td><a href="javascript:void(0)" class="delete-amenity"><span class="dashicons dashicons-trash"></span></a></td>' +
                '</tr>';
            $(".amenities > .form-table > tbody").append(row);
        });

        // Delete a specific amenity from list
        $(".amenities > .form-table").on("click", ".delete-amenity", function () {
            $(this).closest("tr").remove();
        });
    });
</script>
Add CSS Styles for Meta Box
Add CSS styles for repeater post meta box interface.
style.css
.amenities h3{
    margin-top: 20px;
    margin-bottom: 10px;
    padding-bottom: 5px;
    border-bottom: 1px solid #ddd;
    font-size: 14px;
}
.amenities .form-table{
    margin-bottom: 20px !important;
}
.amenities .form-table,
.amenities .form-table th,
.amenities .form-table td{
    border: 1px solid #ddd;
    padding: 10px;
}
.amenities .form-table th.w-auto{
    width: auto;
}
.amenities .form-table th.delete{
    width: 20px;
}
.amenities a{
    text-decoration: none;
}
.amenities a:focus{
    box-shadow: none;
}
Now all we need to do is include the post-meta.php in the theme's functions.php file.
include('post-meta.php');After including the file, our post meta fields will look like in the screenshot below:
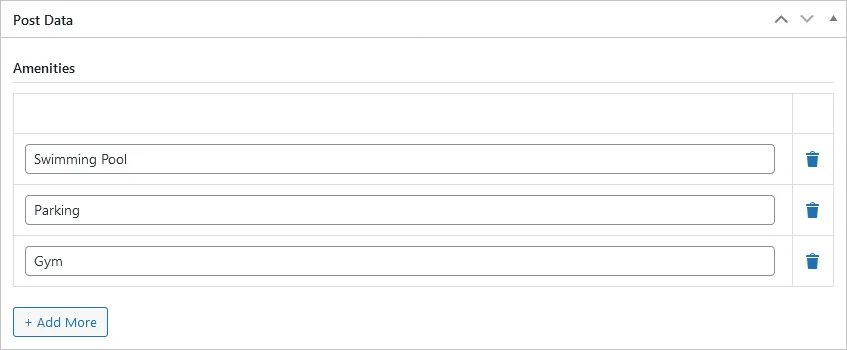
We just demonstrated how to add dynamically created repeating post meta fields for any post type in WordPress. Following the approach in this post, we can add these fields for any post type without using a plugin and without creating multiple individual fields.